Monday, June 28, 2010

Cooking with Beer, Episode 3 - Beer Chili Dogs

Sunday was brew day, so with friends coming over to brew and hang out I wanted to have food for them. What better than a chili, something I could prepare early in the morning and let simmer in the crockpot till we were finished brewing and ready to eat.


The hot dogs were an additional thought, I just couldn't get Sonic the Hedgehog out of my mind, and I can't even remember why he and his chili dog addiction were there to begin with. None the less, the Beer Chili Dogs turned out awesome! Enjoy...


Beer Chili – Recipe


Ingredients:

1.25 Pounds Ground Beef

1 Whole Red Onion (Diced)

1 Whole Yellow Onion (Diced)

1 Whole Green Pepper (Diced)

1 Whole Red Pepper (Diced)

1 Whole Yellow Pepper (Diced)

5 Cloves Garlic (Minced)

3 Tablespoons Olive Oil

2 Tablespoons Ground Cumin

4 Teaspoons Chili Powder

1 Teaspoon Cayenne Pepper

.25 Teaspoon Crushed Black Pepper

3 Teaspoons Sea Salt

2 Whole Mangoes (Cubed)

24 Fluid Ounces Beer *Preferably Maltier, Darker Beer*

28 Ounces Canned Diced Tomatoes (Un-drained)

12 Ounces Canned Tomato Paste

47 Ounces Canned Red Kidney Beans (Drained & Rinsed)


The Process:

Heat the Olive Oil in a large saucepan over a medium-low heat. Add the Ground Beef and cook till it is about to turn a gray, almost light brown (about 10 minutes). Add the Onions, Garlic and Peppers, and cook until tender. (about 5 to 7 minutes). While you sauté the Onions,, Garlic, Peppers and Ground Beef sprinkle the Ground Cumin, Chili Powder, Cayenne Pepper, Crushed Pepper and Sea Salt over top, making sure to mix the spices in evenly. Add the Mango and cook for an additional 2 minutes.

Pour your beer in the large saucepan and simmer over a medium-low heat for roughly 20 minutes. After simmering, transfer the contents of the large saucepan into a crockpot, add the Canned Diced Tomatoes and set to low, allowing the Chili to simmer for five hours. (Now you can set it and forget. So go out and find something else to do, I decided to brew a batch of beer.)

With 30 minutes left in the simmering/cooking process add the Tomato Paste and Red Kidney Beans, stirring until thoroughly mixed, then allow the chili to simmer. Walk away for a half hour, then come back to it and enjoy!

Mayan Gold Chocolate Stout - Recipe & Brew Day

I've been kicking around the idea of brewing this beer for a while now, but have been a bit worried about over doing the chili presence and creating a nuclear meltdown in someone's mouth. Actually, the idea for this beer came to me about a year ago when I happened across Green & Black's Maya Gold dark chocolate bar in a whole foods store out in Akron,Ohio. Being a lover of Dark Chocolate and intrigued by the mix of spices added to the chocolate, I bought a bar to try with a couple of friends back home in Delaware. All I can say is that I was blown away by the taste, the dark chocolate and cinnamon blend great together and there was just a hint of heat in the end. We all agreed it was delicious, and this got me wondering if I could brew a batch of beer, merging these flavors together....

The base beer would be pretty simple, in fact I loosely modeled this recipe after one of my favorites, Rogue's Chocolate Stout. My true concern came about with regards to the spice additions, because I've definitely brewed my fair share of over spiced beers in the past. After looking over a dozen or more Spiced Beer recipes on the internet, reviewing the section in Randy Mosher's Radical Brewing book regarding spice additions and heeding the words of Sam Clalagione in his interview with BYO Magazine, in their September 2006 issue, "Add a little less spice or herbs than your gut is telling you to add.", I felt pretty confident in brewing this beer.

Brew day went fairly well, the only problem I ran into was my propane tank running out on me midway through bring my sparge water up to proper temperature. However, that was an easy fix, just disconnect the empty and slap on a full one.

As I transfered the wort from the kettle to the fermenting vessel, I stole a small sample and was pretty happy with the results. The dark chocolate and cinnamon flavors were there, but not overwhelming, however the heat from the dried chillies was lacking, in fact it wasn't even present, so I might have to dry chili and hope that the capsicum is pulled out by the alcohol in the fermented beer. It will be interesting to see how this beer turns out after fermenting.


Mayan Gold Chocolate Stout (American Stout) – Recipe & Brew Day Stats

Brewed: Sunday, June 27, 2010

Racked: just primary fermentation (minus the 3 gallons sitting on sweet dark cherries)

Bottled/Kegged: Thursday, July 12, 2010

Batch Size (Gal): 7.50

Brewhouse Efficiency: 70%

Wort Boil Time: 90 Minutes

Original Gravity: 1.059

Final Gravity: 1.020

SRM: 45

IBU: 50

ABV: 5.14%


Grains/Sugars (Total Grain Bill (Lbs.): 18.13)

11.88 lbs. American Pale Malt (2~Row)

1.88 lbs. Flaked Oats

1.88 lbs. Chocolate Malt

1.25 lbs. Crystal 40L Malt

.63 lb. Crystal 60L Malt

.63 lb. Roasted Barley


Hops

1.16 oz. Citra, 12.30%, pellet, 60min

0.50 oz. Cascade, 7.40%, pellet,15min

0.50 oz. Cascade, 7.40%, pellet, 1min


Spices

0.56 oz. Cinnamon Sticks (Broken Apart), 1min

0.25 oz. Dried Chili Peppers,1min

4.50 oz. Cocoa Powder, 1min

2.00 Whole Vanilla Beans, 1min


Yeast

WLP001: California Ale Yeast 1500ml. starter


Additives

2 tsp. Irish Moss, 15min


Mash/Boil/Fermentation

H2O/Grain Ratio: 1.32 qt/lb

Sacch. Rest Temp/Time: 152*F/60min

Mash Out Temp/Time: 165*F/10min

Sparge Temp/Time: 170*F/30min

Pre-Boil Vol: 9.32

Post-Boil Vol: 7.93

Evaporation Rate(per hour): 10%

Ferment Temp: 65°F

Primary Fermentation (Days): 11

Secondary Fermentation (Days): (3 gallons will be stored on 4 pounds of pre-frozen sweet dark cherries for a few weeks. Should be interesting!)

Wednesday, June 23, 2010

Cooking with Beer, Episode 2 - Cherry, Raisin & Plum Dubbel Ice Cream

I was on fire today! I mean the beer bread turned out awesome, and i wasn't about to stop there, so I decided to bang out another dish, Beer Ice Cream. Its one of those dishes I've never had success with, but I figured why the heck not try it out once again and see where it takes me. Well it took me far beyond what I was expecting and turned out just as amazing as the Maple Syrup Beer Bread! I mean you can really taste the cherries, raisins and plums that are prominent in the beer, of which I sadly have no more of this beer...


Cherry, Raisin & Plum Dubbel Ice Cream – Recipe


Ingredients:

1 Cup - Heavy Cream

1/3 Cup - Sugar

1 Tsp. - Sea Salt

4 Large - Egg Yolks

12 Oz. - Beer (**Preferably a beer that is maltier**)


The Process:

In a medium saucepan, combine the heavy cream, sugar, and salt, and bring to a simmer over medium-low heat.

In a medium bowl, whisk the egg yolks to break them up, then pour the hot cream mixture slowly over the egg yolks, tempering them by whisking constantly.

Transfer the mixture back into the saucepan and cook slowly over a low heat and stir constantly. The mixture will begin to thicken after 5 to 10 minutes. Take the custard off the heat when it begins to only slightly thicken on the back of a spoon. It will continue cooking from the heat within the custard and you do NOT want the yolks to overcook. Strain the custard to remove any bits of cooked egg into a separate clean bowl.

Stir the beer into the custard mixture. Refrigerate for at least 5 hours, and proceed according to your ice cream machine's instructions. From here on out you're at the whim of your ice cream machine, which mine took about 45 minutes to completely stir and freeze the ice cream. I basically set it and forget it, then came back after 45 minutes to delicious ready to eat ice cream.

Cooking with Beer, Episode 1 - Maple Syrup Beer Bread

Next to brewing, one of my other favorite hobbies is cooking. There is just something satisfying about sharing both beer and food with friends that you've created with your own two hands. And, it is for this reason, that as of late I've become very interested in combining these two passions. So, I've decided to experiment and create dishes that incorporate my homebrews. I'll start off with something common and go from there.


For my first experiment I've chosen beer bread, I mean who doesn't like fresh baked bread. Besides, beer bread is one of those recipes that I see in every beer cookbook and have always wanted to try, but have never really been successful with the outcome. To be honest with you, this beer bread turned out great and has a delicious hint of maple syrup to it!


Maple Syrup Beer Bread – Recipe


Ingredients:

3 Cups - Bread Flour

2 Tbsp. - Sugar

1 Tbsp. - Baking Powder

1 Tsp. - Sea Salt

2 Tbsp. - Maple Syrup

12 Oz. - Beer (**I used my Me So Corny**)

2 Tbsp. - Butter (**Melted**)


The Process:

Preheat the oven to 350 degrees F. Grease and flour a 9″ x 5″ x 3″ inch loaf pan.

In a medium bowl, whisk together the flour, sugar, baking powder and salt. Using the whisk, stir the beer and maple syrup into the dry ingredients until just mixed. (I recommend using a spatula to get all the maple syrup out of your bowl and into the bowl.

Spoon the batter into the pan, and pour the butter on top of the batter. (Use a pastry brush to spread it around if you’d like.)

Bake for 50 to 60 minutes, until top is golden brown and a toothpick/knife inserted in the middle comes out clean. Serve immediately.

Tuesday, June 22, 2010

Me So Corny (American Cream Ale) - Tasting

Sunday, June 20th marked my first finished beer since my return home from Australia. I was pretty damn excited! With a few friends coming over to enjoy a day of brewing and my Grandfather and Uncles over for a Father's Day cookout, I decided to dispense "Me So Corny" out to everyone for feedback and opinions. Everyone loved it and kept going back to the kegerator for more. I call that a success!

Me So Corny - American Cream Ale
OG: 1.050
ABV: 5.43%

Look: Golden, slightly hazy (due to Flaked Corn addition), with a fine white lacy head of foam that last fairly well

Aroma: A faint maltiness, with hints of sweet corn and fruity notes

Taste: Fairly low hop bitterness, just enough to balance the maltiness and sweetness. Faint corn and fruity note detectable, with a fairly dry finish

Mouthfeel: Light and smooth in body with a higher carbonation

The Tiny English Gentleman (Best Bitter) - Recipe & Brew Day

This beer kicks off the first of many brews in my "Tiny Beer" series. No, not tiny in flavor or batch, but in lower on the alcohol side. With the warmer weather and longer nights comes many a lazy weekend summer days/nights of parties, cook-outs and backyard drunken Badminton. And with the crackdown on drunk-driving and the lowering of the legal Blood Alcohol Content in many states, I wanted to start a "brew" series of sessionable beers. This way, friends and family can enjoy a few of my liquid bread concoctions and not get all tipsy at the same time.

While spending a few weeks up at my Aunt and Uncles place in the Seneca Lake region of upper state New York, I came across a small brewpub called Rooster Fish Brewing, which had an amazing Extra Special Bitter on tap. I instantly fell in love with the style and when I got back home started buying English-style Bitters. There is just something about these very quaff-able beers, with their light bodies, moderate carbonation, somewhat assertive hop presence and fruit, biscuity, bread-like, toasty, malty notes, that makes them delicious.

After searching the Interwebs for recipes, I came across Jamil's Ordinary Bitter and Jamil's Extra Special Bitter, which seemed like a nice place to start. I settled on taking parts from both recipes and brewing a Best Bitter. I couldn't find the Special Roast Malt, although I did have Victory Malt, which is by no means a substitute, but it will have to do.

The brew day itself went fairly smooth, other than my drill breaking down and I had to hand crank the grain mill, but no mistakes on the brewing side, or missed target gravities this time. The Best Bitter came out at about 1.047, which is on the higher end of the starting gravity. After pitching my 1600ml starter, I put the fermenter into my newly converted chest freezer controlled fermentation environment and set the dial for 68*F. Within 5 hours fermentation kicked in and the airlock was a bubbling.

The Tiny English Gentleman (Best Bitter) – Recipe & Brew Day Stats

Brewed: Sunday: June 20, 2010

Racked: just primary fermentation

Bottled/Kegged:July 3, 2010


Batch Size (Gal): 10.00

Brewhouse Efficiency: 70%

Wort Boil Time: 90 Minutes

Original Gravity: 1.047

Final Gravity:1.015

SRM: 11

IBU: 31

ABV: 4.32%


Grains/Sugars (Total Grain Bill (Lbs.): 18.02)

15.83 lbs. Maris Otter Pale Ale Malt (2~Row)

0.83 lbs. Crystal 120L Malt

0.83 lb. Aromatic Malt

0.52 lb. Victory Malt


Hops

0.25 oz. Mt. Hood, 4.70%, pellet, 60min

2.00 oz. East Kent Golding, 4.50%, pellet, 60min

1.00 oz. East Kent Golding, 4.50%, pellet, 15min

1.00 oz. East Kent Golding, 4.50%, pellet, 1min


Yeast

WLP002: English Ale Yeast 1600ml. starter


Additives

2 tsp. Irish Moss, 15min


Mash/Boil/Fermentation

H2O/Grain Ratio: 1.33 qt/lb

Sacch. Rest Temp/Time: 152*F/75min

Mash Out Temp/Time: 165*F/10min

Sparge Temp/Time: 170*F/30min

Pre-Boil Vol: 12

Post-Boil Vol: 10

Evaporation Rate(per hour): 10%

Ferment Temp: 68°F

Primary Fermentation (Days):13

Secondary Fermentation (Days): N/A

Thursday, June 10, 2010

Preparing Oak For the American tripel


"I'm getting wood from this beer."

I literally had to spit my beer back into the glass; it was all I could do from choking on, or spitting my beer out over a host of other beer drinkers.

"I'm getting wood from this beer.", is definitely not something you want to hear at a beer tasting filled with dudes, but the Australian at the local bottleshop beer tasting felt very strongly about his statement of "getting" wood from Red Oak Boutique Beer Cafe's "Special Reserve Barleywine". I stood there coughing, while others around me chuckled. The Australian turned a nice shade of "embarrassed" red, while the gentleman leading the tasting tried to recover as best he could with reassuring words of, "You're somewhat right, there are slight hints of oak in the aroma, and the 2 years of aging on oak adds a slight hint of vanilla."

After recomposing myself I thought, "God! Where were all my friends for this one? They're never going to believe me when I tell them this story." The I thought, "I'm getting wood from this beer. Damn! Why didn't I think of it first!"

I've tasted and brewed quite a few wood-aged beers, but never have they given me a "straight wood" (Hahahahahaha!!!) flavor, most often light hints of vanilla, cocoa, caramel, toffee or even a slight fresh oakiness. However, I've never had the patients to experiment too deeply into the realms of wood-aged beers, mostly because the thought of having to wait months on end for the flavors to develop, which is just way too long. Plus, I've heard horror stories of homebrewers overexposing their beers to oak and ending up with beers that taste like you're chewing on tree bark. Bleh!!! However, with breweries like Firestone Walker, Jolly Pumpkin, Captain Lawrence, Russian River and my favorite, Dogfish Head, which has their "Palo Santo Marron", pumping out some beautiful, full, rich delicious barrel aged beers, my desire to experiment with wood-aging has been rekindled.

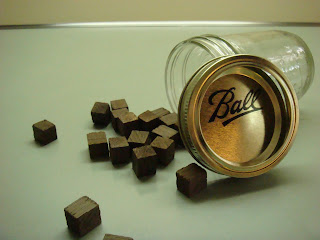
Having just brewed an American Tripel, I figured now would be the best time to experiment with wood-aging. My goal is to simulate a wine barrel aging using medium toast Hungarian oak cubes. Now, it will be a month before the American Tripel is ready to be transferred to the secondary, and I'm only going to age three of the six gallons total on the oak, this gives me enough time to let the wine leech into the oak cubes before I add them to the fermenter. Perfect!!!

I usually use two ounces of cubes for a five gallon batch of brew, about .4 ounces per gallon; for the three gallons I weighed out 1.4 ounces of cubes. The cubes smelled a bit intense, to remove some of the intense oakiness I added the cubes to a Pyrex measuring cup, covered them with water and heated them in the microwave until the wood-water mix began to boil.

After the boil I let the cubes steam for a total of two minutes and repeated the process once more. As soon as the cubes were finished steaming, I added them to a small Mason Jar and covered with wine. I went with a favorite of mine, the 2006 Syrah from Hazlitt's 1852 Vineyard, which has bold notes of Black Pepper and Black Currants, this should be quite interesting! I'll let the wine and oak cubes infuse for the next month, then introduce the cubes to the beer and age for a year, tasting every so often, until the flavor and aroma meet my taste preference.